Sunday, November 17, 2013

Pumpkin Spice Cupcakes

Ok, I am not even a huge supporter of the pumpkin spice craze, but I have become obsessed with these "cupcakes" very quickly! I was inspired by my pumpkin chocolate chip cookies and figured, how hard could it be to create? Also, the cupcakes themselves are not terribly sweet so I think without the frosting, they would make a tasty muffin if you'd rather avoid the cream cheese frosting. I went for the mini cupcake version to keep me from eating huge amounts, though I think it's more of an excuse to eat more. Oh well! Once you have a bite you will love them too. 


Pumpkin Spice Cupcakes 
(12 cupcakes or 24 mini cupcakes)
For Cupcakes 
1 1⁄2 c. Flour 
1 1⁄2 tsp. Baking Powder 
1⁄2 tsp. Baking Soda 
1 tsp. Cinnamon 
1⁄2 tsp. Cloves 
1⁄4 tsp. Ginger 
1⁄4 tsp. Nutmeg 
8 tablespoons Butter 
1 c. Sugar 
2 Eggs 
3⁄4 c. Pure Pumpkin, (half a can) 
1 tbsp. Honey 
1⁄4 c. Hot water 

For Maple Cream Cheese Frosting 
4 tbsp. Butter 
6 oz. Cream Cheese 
1⁄4 c. Maple Syrup 
4 c. Powdered Sugar 
1⁄2 tsp. Vanilla Extract

OR

Maple Buttercream Frosting
1 cup (2 sticks) unsalted butter, softened 
1 cup confectioner’s sugar 
1 cup maple syrup 
1 teaspoon vanilla extract

1⁄4 teaspoon kosher salt 

1. For Cupcakes/Muffins:
2. Combine flour, baking powder, baking soda, cinnamon, cloves, ginger and nutmeg in a bowl.
3. In a mixer beat room temperature butter with the paddle attachment until smooth. Add sugar and continue to blend. Add eggs and pumpkin and mix until combined. Add honey and hot
water.
4. Slowly add in flour mixture to other ingredients on a low mixing speed.
5. Spoon batter into lightly greased muffin liners and bake in oven at 350 degrees for 18-20 minutes for mini cupcakes and 20-25 minutes for regular cupcakes. Let cool completely before
frosting.

For Cream Cheese Frosting:
Combine butter, cream cheese, powdered sugar, vanilla extract, and maple syrup in mixing bowl and beat for at least 2 minutes. Decorate cupcakes with frosting and a light sprinkle of cinnamon or cloves if desired.

For Maple Buttercream Frosting:

Cream softened butter with the paddle attachment of your stand mixer or beat well with your hand mixer until the butter has lightened in color, about 3 minutes. Add confectioner’s sugar and incorporate fully. Turn your mixer onto high speed to make sure the sugar is well incorporated and to lighten the mixture. Reduce the speed of your mixer and add maple syrup, vanilla extract, and salt. Turn your mixer back onto high speed and beat for about 30 seconds to lighten. Taste the buttercream to make sure it has the flavor you prefer, if you would like more maple flavor, add maple flavoring 1 teaspoon at a time until it has reached the flavor you prefer. You may need to incorporate additional sugar to have your buttercream at the proper consistency.

**I prefer the buttercream frosting as the maple flavor is much more present. However, if you are a huge fan of cream cheese frosting, then by all means, use that. It is also delicious! Just a little less maple-y. 


Thursday, September 12, 2013

Apple Ice Creamy Treat!

I love fall. LOVE. And it is officially fall the day grocery stores fill up with bags and bags of apples. You know that moment. I begin dreaming of everything I can possibly make with apples! This week alone has featured apple pie, sliced apples every day, pork chops with apple chutney, and this evening's amazing dessert - vanilla ice cream with a quick apple topping. I made up this dessert a few years ago, and somehow between December and August, I manage to forget about it entirely. Then, one evening in autumn I am struck by how much I miss this tasty treat. My best description is just apple pie filling dumped on top of ice cream - except it only takes 10 minutes to make. Instant yummy!


Start with a nice, crispy apple. Pick your favorite type! Peel it and dice it up. Nice small pieces help it cook more quickly.

Melt 2 tablespoons of butter in a saucepan over medium heat and then toss in the apples. Let them cook in the butter for about 2 minutes and then add in 1/4 cup of brown sugar, 1/2 tsp cinnamon, 1/4 tsp ground cloves, and 1/4 tsp ground nutmeg. Stir together and let it simmer about 8 minutes, stirring occasionally. The extra time helps the sugar caramelize giving it some extra flavor!


Dish up 2 bowls of vanilla ice cream, and spoon the apples over the top. Enjoy!


Apple Ice Cream Topping
(2 servings)
  • 1 Apple
  • 2 tbsp Butter
  • ¼ cup Brown Sugar
  • ½ tsp Cinnamon
  • ¼ tsp Ground Nutmeg
  • ¼ tsp Ground Cloves


1. Peel, core, and dice up the apple.
2. Melt butter in a saucepan over medium heat. Add apples and let it cook for 2 minutes.
3. Add brown sugar and spices and stir occasionally while it cooks another 8 minutes.
4. Serve hot over vanilla ice cream.


Wednesday, August 21, 2013

Chipotle Chicken Sliders

I know I am occasionally prone to exaggeration, but trust me when I say that tonight's dinner may have been my favorite meal I have ever made...ever. I borrowed the recipe for these sliders from a fellow food blogger - simply scratch - and I do not regret it for a moment. If you have any affinity for chipotle flavor, these are a MUST MAKE; as in go to the store now and buy the ingredients and make them now.

They took me maybe 10 minutes to put together so there is no fancy effort required. I used 1/4 cup minced cilantro, 1 lb ground chicken, 2 minced chipotle chiles in adobo sauce, 1 tsp of the adobo sauce from the can, 1 tsp salt, 3/4 tsp onion powder, 3/4 tsp garlic powder, and a sprinkle of pepper. I often modify recipes, but this one needed no help! Combine all ingredients in a bowl and use fingers to mix together. (Who doesn't love that slightly disgusting and wonderful feeling!) I was able to form about 8 slider size burgers out of the meat. Then I just tossed them on the grill for 5 minutes on each side, and added some cheddar cheese when I flipped them. They were incredibly juicy and amazing! I added avocado to the top of mine, and Alex used ketchup. Just pick your favorite burger toppings, pile them on, and enjoy every last bite.


If you want to try out the shoestring fries, feel free to give them a whirl as well. I assumed they'd be a pain but they were remarkably simple once I stopped fighting with my mandolin. That is the best trick I can offer. Use a mandolin to slice 2 potatoes very thin. Then slice those slices into skinny fries. Toss them with 3 tbsp olive oil and lay them out on 2 well-oiled baking pans. Bake at 425 degrees for 18-20 minutes turning and shifting the fries a few times while cooking. Once they are done, lay them out on wax paper to cool and sprinkle with salt and pepper. Piece of cake! Or potato...Or whatever....

Sunday, August 11, 2013

Apple Crisp

After our tasty salmon dinner I had a craving for something simple and sweet, so I decided to make a mini apple crisp for 2. I kept it quick and simple. I sliced one apple and tossed it with a little cinnamon. Then I mixed up 2 tbsp brown sugar, 2 tbsp flour, 2 tbsp oatmeal, a sprinkle of cinnamon, a sprinkle of nutmeg, and 1 tbsp of butter. I crumbled it together, sprinkled it on the top, and baked it at 350 for 35 minutes. Simple and delicious!


 We added a little ice cream to the top but by that point, we were too hungry for more pictures. Yum!

Cedar Plank Salmon with Dill Butter

Sunday dinner is a big deal in our house and I love to take the time to make a little something special every week. I decided to stretch the budget and spring for fresh salmon as a starting point. (The frozen stuff just doesn't begin to compare on flavor and texture.) My husband reminded me that we used to have a couple cedar planks that we used when we were first married but of course they were long gone. So we added in an afternoon trip to Home Depot to pick up new cedar planks. I know you have to soak them in water but I read somewhere once something about soaking them in white wine instead!

 Luckily I had a half drunk bottle of Cupcake wine sitting in my fridge. My favorite!

I let it soak about an hour, while I prepped my dill butter. This recipe I borrowed from my California Fresh Harvest cookbook and it really does remind me of my childhood even though it is a more recently discovered recipe. It's quite simple to put together but absolutely worth it. You just need a 1/2 cup of softened butter, 1/2 cup of chopped parsley, 1/4 cup dill, lemon zest from 1/2 a lemon, and some salt and pepper. Just combine all ingredients in a bowl and mix well!


Then roll it into a cylinder and wrap it in wax paper. Place back in the refrigerator until serving time.


Next, I pulled out the salmon and spread a light drizzle of olive oil over the top. I added a sprinkle of salt and pepper, and zested the rest of the lemon over the top. I had planned to add a little  chopped dill as well but I got lazy (and hungry!) 


That photo reminds me that I also added some grilled green beans to the menu - fresh from the garden! Tomatoes aren't the only thing that are ripe and delicious right now, and my beans wanted their chance to shine too. I prepped them very simply, just tossing them with salt, pepper, olive oil, and a light sprinkle of montreal steak seasoning (my go-to for everything it seems :) On a whim, I also added a little lemon zest as I had a bit left and didn't want it to go to waste. 


Definitely a good choice! I headed for my grill which was preheated to around 350. 


It smelled amazing on the grill. The beans I laid out on my grill pan and tossed around every few minutes to cook them evenly. I think tomorrow I may invest in a grill basket though as I have wanted one all season and I KNOW it would go to great use with all of our veggies on the grill. 


The beans took just 5-8 minutes and the salmon was more like 15. I got to enjoy the warm sunshine while I waited for everything to cook. And this was one of those weeks that dinner was absolutely worth the wait.

Don't forget to add the dill butter to the top!


Saturday, August 10, 2013

Crepes: Savory and Sweet

Gabriel and I took a trip to the Great Falls Farmer's Market today to pick up some delicious veggies for our juicing. In addition to some great produce stands, they had honey, eggs, meat, cookies, cakes, and a bluegrass band! Oh and a crepe stand. While we did not stay to enjoy the crepes there, I could not wipe them from my mind so I decided we needed crepes for lunch/dessert. I couldn't decide which I wanted more so I decided to make one of each. I have used this crepe recipe for years and often don't bother with fillings - they taste amazing just rolled up. But today I wanted to stuff them as well. The first one, I put ham and cheese in, rolled up, and put back on the hot skillet for a few minutes to melt the inside. It was a perfect, not too heavy, lunch.


The second one, I filled with melted chocolate chips and strawberries. A perfect ending to my craving for crepes!

Crepes:
  • 2 Eggs
  • 1 cup Milk
  • 1 cup Flour
  • ¼ tsp Salt
  • 2 tbsp Butter
  • 2 tbsp Honey (optional)

1. Beat eggs, then add other ingredients and mix well. (Use honey for a sweeter crepe) Cover and let it stand for 30 minutes.
2. Heat a skillet to medium and lightly coat with non-stick spray. Using 1/3 c measure, pour batter into pan and twist pan around to spread batter evenly around the bottom. Allow it to cook until the edges begin to pull back. (about 30 seconds.) Continue with all of the batter.
3. Fill with your favorite ingredients!

Thursday, August 8, 2013

Tomato Sauce

Yesterday, a quick trip out to my garden to grab some greens for my juice turned into a giant tomato-picking expedition, and I came back into the house with 20 giant, red, ripe tomatoes. I did not want to put a single one to waste, but I knew I was not going to eat 20 tomatoes in a few days. So I researched many recipes on home made tomato sauce. I got the basic idea, and then decided to basically make it up on my own! The results were wonderful. Here is my version of homemade tomato sauce.

Tomato Sauce

  • 20 Fresh Tomatoes
  • 2 tbsp Olive Oil
  • 4 cloves, minced Garlic
  • 1 small onion, diced Onion
  • ¼ cup Basil - chopped
  • Salt and black pepper


1. Cut the stem area out of each tomato, and cut an x into the bottom. Boil a large pot of water. Place tomato in the water for 30-60 seconds until the skin begins to peel back. Remove from the water and immediately blanch in ice water to stop the cooking process. Then peel off the skin.
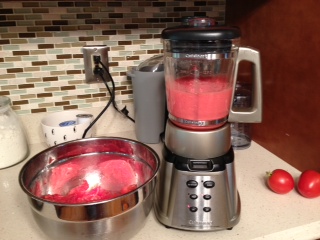
2. Remove the seeds and water from each tomato. Then put the remaining meat of the tomatoes into a blender or food processor for 1-2 minutes, until smooth.
3. On the stove, heat the olive oil, then add onions, cooking until soft. Add garlic and saute for a minute. Then add the tomato puree. Stir and bring to a boil. Turn down to a simmer and allow to reduce for 2 hours, stirring occasionally. Add basil and salt and pepper to taste, and cook for an additional 20 minutes.
4. Remove from heat and use with any cooking. Store in the refrigerator for a week or the freezer for up to 6 months.


Tomatoes with the stems and bottoms cut

Blanching in ice water after being boiled

Removing seeds and juice
Pureeing the tomatoes in the blender

Wednesday, August 7, 2013

A Trip to Frying Pan Park

We headed out this morning on a family outing to Frying Pan Park for their Wednesday farmer's market. I must admit it was a total disappointment as there were just 2 vendors there. But one of them was selling fresh jalapeno cheese bread so we had to try it! We turned it into some tasty paninis for lunch, and wow were they good.

Kale Chips (or the best snack ever!)

No seriously. If you are a sceptic, I am begging you to try just once. My aversion to the total "health foods" kept me away from these for a long time as they sounded just gross! But I am begging you. Try them just once, or stop by one afternoon and I will share mine with you.

Kale Chips
  • 1 Bunch of Kale
  • 2 tbsp Olive Oil
  • enough Salt and black pepper
  • (optional) Montreal Steak Seasonng


1. Preheat oven to 325 degrees. Wash kale and break into bite size pieces.
2. Toss kale with olive oil and spices of your choosing. I like a little salt and pepper, and montreal steak seasoning, but you can use anything really.
3. Lay out in a single layer on a lightly greased pan. Bake for 10-15 minutes turning once, but watch them closely!
4. Serve immediately or let cool and save for later. You can store them completely cooled in a tupperware container for a day or two but mine never last more than an hour!

How Does My Garden Grow?

My garden is bursting at the seams! This year, I dedicated my garden to everything I need for juicing. (More on that in another post.) But of course, I continue to be amazed by how well tomatoes grow in the beautiful state so I put in just 2 plants this year. And they are out of control! I brought in 18 tomatoes today and will have even more tomorrow so I am hunting for a tomato sauce recipe currently. The rest of everything you see went into today's juice, and a tray of kale chips which I split with Gabriel. I definitely have a minor kale chip addiction. Every time I make them, I see them on the pan and think, there is no way that these will taste good. All it takes is one bite melting in my mouth to remind me that they are so much better than any store bought chip of any kind ever could be.
Pictured here are collard greens, kale, carrots, and a small selection of today's tomatoes. 

Tuesday, August 6, 2013

A-Mazing Biscuits!

No seriously. The flavor of these is remarkable considering that they are (can be) lower in calories. I also learned and confirmed two great baking tricks that I will share in this recipe. We enjoyed these along with beer boiled Old Bay Shrimp.

Low-Fat Diner Style Biscuits
(About 12 biscuits)

  • 2 cups of all-purpose flour
  • 2 ½ teaspoons baking powder
  • Dash of salt
  • 5 tablespoons cold butter, cut into slices
  • ½ cup light cream (I used 2% milk for both this and the following milk and did not lose any flavor)
  • ¼ cup milk
  • 2 ½ tablespoons sugar (Or splenda) 


1. Mix together the flour, baking powder and salt in a medium size mixing bowl. Using a pastry blender, add the butter and cut into the flour mixture until it resembles a coarse meal. Here is baking trick #1. I placed these ingredients into my mini food processor and used the pulse setting to get my "coarse meal." I got the idea from a Bon Appetit recipe and figured it would completely overwork the pastry. But this is the third time I have tried it with incredible results! I feel like such a cheater, but the proof is in the pudding. And I have never had such flaky, amazing dough. It’s okay if you have small chunks of butter, that’s what you want! Cover and chill for at least 10 minutes.
2. Once chilled, add in light cream and sugar and mix until just combined. Place dough on a lightly floured surface and knead about 4 times. To roll them out, use a rolling pin and roll out to about the size of a 9 x 5 rectangle. Then fold the dough, vertically, in thirds. You should have a thinner, taller rectangle of dough. Roll dough back out to a 9 x 5 rectangle and then fold again crosswise in thirds. Then, roll the dough out to about 3/4 – 1 inch thickness. Wow! How did I never realize this is how you get those seemingly layered biscuits that just pull in half. Feel free to repeat the folding trick 3 or 4 times. Using a small circular cookie cutter (or 1/3 measuring cup dusted with flour) cut out biscuits.
3. Preheat oven to 400 degrees F and lightly grease a baking sheet with non-stick cooking spray. Place biscuits about an inch apart on the baking sheet and bake for 10 – 12 minutes, or until they’ve puffed up and are golden brown. Serve immediately and enjoy! 

Tuesday, July 9, 2013

Avocado Toasties

Let's begin with something simple. These delicious open faced sandwiches could not be easier to make and are a perfect summer lunch! I found this wonderful recipe in my Chloe's Kitchen cookbook. (Highly recommend) They make this California girl feel right at home.

Avocado Toasties:
Sliced bread (I like sourdough, but I'm sure it would be great with anything!)
1/2 ripe avocado, pitted and sliced
Olive Oil
Salt and Pepper to taste
Red Pepper Flakes

Toast up the bread on both sides. Spread out the avocado between the 2 slices. Drizzle with olive oil, and sprinkle with salt, pepper, and red pepper flakes. Chloe also suggests a light squirt of lemon, but I prefer it without. Feel free to try it both ways!

Welcome!

I am so excited to begin this blogging journey. I have tried a few before, and like many endeavors, they often burn out over time. But my renewed love of cooking this summer better be here to stay, and creating this blog just allows me a record of some of the fun, new dishes I try out. It is also a place that I hope you can borrow ideas from, or even add comments with your own successful ideas! My dream goal is to post once a day with a good foodie idea, but I am realistic that shooting for perhaps 5 days a week is a better starting point. I am going to pull out a few posts from the past week all at once, as it has been a rather delicious week in this house! Finally, I want to credit my awesome husband for all of the pictures on this blog. His photography skills are amazing and he makes all of my food look so good. Bon Appetit!